Html Blogger: Guide: Search It
Hello everyone,

I am back from my holidays and decided to share something with you. Today's guide is about search. I know we have the nav bar up the top for that but that is not my favourite two options.
My ways puts search inside the blog.
Often blogs come with a search box built in on some templates but not really on the standard templates.
I'll start off with the easy html - free google way.
You will need
# Admin Privs
Time aprox: 5 - 3 minutes.
1. Go to Blogger in draft (the beta blogger)
I will do an article on its pros and cons later but now back to the guide.....
2. Click the layout link, it will take you to the Edit layout page, click add gadget.
3. Then click search box.
It should make a search box for you
Way two:
You will need:
# admin privs
Time 1 mins - 2 mins
copy this code into a widget
Sorry for the lack of topics I will be back to more harder things soon Any ideas?
Dmaster
I am back from my holidays and decided to share something with you. Today's guide is about search. I know we have the nav bar up the top for that but that is not my favourite two options.
My ways puts search inside the blog.
Often blogs come with a search box built in on some templates but not really on the standard templates.
I'll start off with the easy html - free google way.
You will need
# Admin Privs
Time aprox: 5 - 3 minutes.
1. Go to Blogger in draft (the beta blogger)
I will do an article on its pros and cons later but now back to the guide.....
2. Click the layout link, it will take you to the Edit layout page, click add gadget.
3. Then click search box.
It should make a search box for you
Way two:
You will need:
# admin privs
Time 1 mins - 2 mins
copy this code into a widget
Sorry for the lack of topics I will be back to more harder things soon Any ideas?
Dmaster
BloghackI
Hi everyone! I decided to change Html Guides to BlogGuides
I know you've been waiting for this for ages but I had to get official clearance from Maryann. I like making sure topics are ok and so at last I present to you
BlogGuide IV: Emotes
I know both LM and myself got a flood of emails much like this....
Dear TP,
how do you do emotes in blogger....
Well heres how the cool way:
You will need:

The code is
img.emoticon {
padding: 0;
margin: 0;
border: 0;
}
Hope you enjoy your emotes
Dmaster
I know you've been waiting for this for ages but I had to get official clearance from Maryann. I like making sure topics are ok and so at last I present to you
BlogGuide IV: Emotes
I know both LM and myself got a flood of emails much like this....
Dear TP,
how do you do emotes in blogger....
Well heres how the cool way:
You will need:
- Mozilla Firefox
- A few add-ons
- Time
- Admin priv.
- Open Firefox (note this will not work with IE Safari GC or Opera)
- (please note CPC is not responsible if this mucks up you)Download the Add on Greasemonkey. This is for Add on to enhance pages
- Next download the Emoticons to work with Greasemonkey.
- Install both greasemonkey and the emotes

- Open up the Edit Html link in your blogger page

The code is
img.emoticon {
padding: 0;
margin: 0;
border: 0;
}
Hope you enjoy your emotes
Dmaster
HTML GUIDE II: Animated Text
This is my second Html Guide yay! Today I'm gonna explain some Animated Text Effects.
Most of the examples below work in all browsers that were released around 2000 or later.
Moving on....
Most of the examples below work in all browsers that were released around 2000 or later.
Moving on....
The simplest type of Animated Text is call Marquee Text code and can easily be done in HTML. Marquee can move right left and up and down in a simple fashion. To create more advanced effects you need Adobe Flash or other pricey software. So I guess it's back to Marquee for now ;-)
Exercise I:
Slide Marquee
To do a slide marquee, type:
To change the direction instead of direction="left" type direction="right". This should make the text go to either side in motion.
Scroll
To do a scroll marquee, type:
To change the direction to downward, type direction="down"
One last word on marquee before I have some updates to make: I suggest you don't use them as much in post. People find them hard to keep track of in long posts. I suggest them as footers and below your headers as like A Welcome Notice.
Last but not least, an update on Favicons. I got a few emails about how it was not working for some of you. Don't freak out too much! We issued a Favicon Fun Fix. Me and LM suggest you add all the favicon codes to make sure all your readers can see your icon. I might talk to LM about designing a Technopengi one.
For next week, I'll try to make the tutorial in video as well as in text version. You can email me to my new contact page.
Dmaster/David
One last word on marquee before I have some updates to make: I suggest you don't use them as much in post. People find them hard to keep track of in long posts. I suggest them as footers and below your headers as like A Welcome Notice.
Last but not least, an update on Favicons. I got a few emails about how it was not working for some of you. Don't freak out too much! We issued a Favicon Fun Fix. Me and LM suggest you add all the favicon codes to make sure all your readers can see your icon. I might talk to LM about designing a Technopengi one.
For next week, I'll try to make the tutorial in video as well as in text version. You can email me to my new contact page.
Dmaster/David
Favicon Fun Fix!
LM: Yeehaw!
DMaster: Hello! Looks like the Favicon Html Guide did not work for some of you.
LM: Although it worked for us, it doesn't mean that it would work for everybody. That is because we all have different Blog Templates, not to mention different web browsers
DMaster: like Internet Explorer, Firefox & Opera!
LM: and different Operating Systems
DMaster: like Windows, Linux & Mac
LM: That means, some templates may require a whole new HTML code or just a different location in your template.
LM & DMaster: So now, we have researched and tested 2 Favicon Fun Fixes that will be compatible with your template, web browser and operating system. Here they are:
Step 1: Complete your Favicon Html Code as shown:
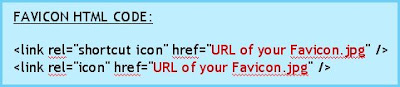 Replace the codes in red with the URL of your favicon.
(Please note that aside from JPG, you may also use images in the following format: ico, png and gif. You may also use an animated favicon in GIF format.)
Step 2: Now, let's put the FAVICON HTML CODE into your template!
There are 2 more ways to do it. Choose one that works for you!
DMaster: Hello! Looks like the Favicon Html Guide did not work for some of you.
LM: Although it worked for us, it doesn't mean that it would work for everybody. That is because we all have different Blog Templates, not to mention different web browsers
DMaster: like Internet Explorer, Firefox & Opera!
LM: and different Operating Systems
DMaster: like Windows, Linux & Mac
LM: That means, some templates may require a whole new HTML code or just a different location in your template.
LM & DMaster: So now, we have researched and tested 2 Favicon Fun Fixes that will be compatible with your template, web browser and operating system. Here they are:
Step 1: Complete your Favicon Html Code as shown:
 Replace the codes in red with the URL of your favicon.
(Please note that aside from JPG, you may also use images in the following format: ico, png and gif. You may also use an animated favicon in GIF format.)
Step 2: Now, let's put the FAVICON HTML CODE into your template!
There are 2 more ways to do it. Choose one that works for you!
Choice 1: Look for the Head Tags and paste your Favicon code ANYWHERE in between, like this:

Choice 2: Look for the the b:skin code and paste your Favicon HTML Code right below it, like this:

Step 3: Now save your template and check out the favicon beside your URL in the address bar!
DMaster: We hope this fixes your Favicon problem! Until next time...
LM: Ciao! ;-)
.
DMaster: We hope this fixes your Favicon problem! Until next time...
LM: Ciao! ;-)
.
Favicon Fun
Welcome everyone to this Html-Guide. My name is Dmaster.
Today's Technopengi is about Favicons.
So what is a Favicon?
A Favicon is the icon that appears before a URL when you enter a webpage. In blogger it is set as a the orange Blogger-Logo, you all know.
This can be changed to a personalized logo with these steps:
1. Make a logo 16 X 16 pixels or 32 X 32. ( I suggest a low detail image otherwise it will be not easy to see and not very clear.) Here are samples which you may copy/download and use as template:
 16px Square
 32px Square
2. Upload the image ( 16 x 16 or 32 x 32 ) to a web image hosting service NB not photobucket I encountered some problems with that.
3. Find the direct URL. (by direct URL I mean the URL that take you to only the image)
4. Copy the direct URL.
5. Open blogger. Click the layout link, the "edit HTML" tab, this takes you to the HTML source of your template.
Search for the title tag, as shown
and after that, type

paste your direct URL where it says url of your logo.jpeg
NB put quotation marks at the end and beginning of the URL
(Note: your image can also be gif, png, or ico - LM)
6. Save Template and you're done!
Congrats you made a Favicon!
Hope this wasn't too hard. Feel free to comment!
Next time if you want something simple, I have a few ideas in mind…
Dmaster/David
UPDATE: IF IT DIDN'T WORK TRY THE alternant code on Favicon Fixes
Today's Technopengi is about Favicons.
So what is a Favicon?
A Favicon is the icon that appears before a URL when you enter a webpage. In blogger it is set as a the orange Blogger-Logo, you all know.
This can be changed to a personalized logo with these steps:
1. Make a logo 16 X 16 pixels or 32 X 32. ( I suggest a low detail image otherwise it will be not easy to see and not very clear.) Here are samples which you may copy/download and use as template:
 16px Square
 32px Square
2. Upload the image ( 16 x 16 or 32 x 32 ) to a web image hosting service NB not photobucket I encountered some problems with that.
3. Find the direct URL. (by direct URL I mean the URL that take you to only the image)
4. Copy the direct URL.
5. Open blogger. Click the layout link, the "edit HTML" tab, this takes you to the HTML source of your template.
Search for the title tag, as shown

and after that, type

paste your direct URL where it says url of your logo.jpeg
NB put quotation marks at the end and beginning of the URL
(Note: your image can also be gif, png, or ico - LM)
6. Save Template and you're done!
Congrats you made a Favicon!
Hope this wasn't too hard. Feel free to comment!
Next time if you want something simple, I have a few ideas in mind…
Dmaster/David
UPDATE: IF IT DIDN'T WORK TRY THE alternant code on Favicon Fixes
Blog Trick #2: Center Alignment
This is the Right Yellow Sidebar in Club Penguin Crazy Main Page

Things that you put on your sidebars are called Widgets. They are small programs or scripts or codes that do specific tasks. The problem is, those widgets are often shown or posted on the LEFT! It would definitely be nicer if those widgets are posted right at the CENTER!
Here is how:
For example purposes, we will use Who's On Widget from www. amung.us. This is the code that Amungus gives you.

Things that you put on your sidebars are called Widgets. They are small programs or scripts or codes that do specific tasks. The problem is, those widgets are often shown or posted on the LEFT! It would definitely be nicer if those widgets are posted right at the CENTER!
Here is how:
For example purposes, we will use Who's On Widget from www. amung.us. This is the code that Amungus gives you.

This code adds the widget to the LEFT of your sidebar.
To move the widget to the center, simply add the codes highlighted in red at the beginning and end of the code above:
To move the widget to the center, simply add the codes highlighted in red at the beginning and end of the code above:
 Now, the widget will be added to the CENTER of your sidebar.
Homework: Try replacing the word "center" in the code with the following and see what happens:
1. Left
2. Right
3. Justify
Enjoy the Code! ;-)

Blog Trick #1: Open Link in New Window
Have you ever been to a site where you click on something, say a picture, that you really liked then forgetting to go back to the site that lead you to that picture in the first place? Well, that's every blogger's nightmare! aaaaarrrrgggghhhh! ;-) We want to hold each and every visitor. But the sad thing is, some viewers are fickle-minded (hehehe) and are easily led to ummm other sites :-(
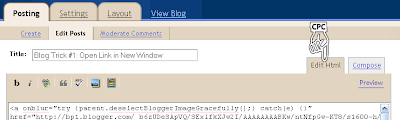
Though it's not fool-proof, opening pictures and other links in another window helps keep viewers on your site and not veer away from your page too quickly.
Using the image above, here's how to manually change the code to open pics or links in new tab or window:
First, access the HTML code of the post by clicking the EDIT HTML tab:

Though it's not fool-proof, opening pictures and other links in another window helps keep viewers on your site and not veer away from your page too quickly.
Using the image above, here's how to manually change the code to open pics or links in new tab or window:
First, access the HTML code of the post by clicking the EDIT HTML tab:

This is the HTML Code of the Image above (automatically generated by Blogger when you attach an image):
 Each link, whether a website address or a pic, will generate an href code (in highlight). Href is followed by a link. It is that link where you go to. To make that link OPEN in Another Window, just add this code at the end of an href statement:
target="_new" OR target="_blank"
So, to make the code above open in a new window, here is the new code:
 That's it. Now, try clicking the images above and see what happens.
Enjoy the code! ;-)

 Posts
Posts


