I think blogging is much more interesting and effective if it has nice pictures to go with great posts. You are NOT going to find a Club Penguin blog WITHOUT pictures ;-) You might be surprised that quite a number of CP bloggers emailed me asking how to take pics. After this tutorial, you won't be copying pics from other sites again ;-)
METHOD #1: Using What Is Already In Your Computer

This is very easy. But you couldn't really do much ;-)
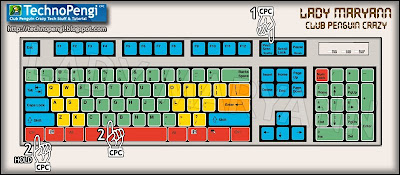
1. When the image you would like to capture is on screen, press the PRINT SCREEN KEY (CPC Hand #1) on your keyboard. You can only take ONE picture at a time.
2. Open ANY photo editing software. If you are using Windows, you will have MSPaint (aka Paint) and probably MS Picture Manager. Of these 2, I would prefer Picture Manager. **MS stands for MicroSoft duh ;-)**
3. Load up the "captured" or "grabbed" image to Paint or Picture Manager by: (a) Click Edit>Paste (Yellow Highlighted Menu Bar) OR (b) While pressing down CTRL KEY (CPC Hand #2), press the V KEY.
Now, you should be seeing the captured screen. If you want the WHOLE pic, then you can save it now. But if you just want a certain "part" of the captured screen, then we will CROP or TRIM it.
4. Basic Editing Using Paint.
(a) Selecting/Cropping the Image. Click the Rectangular Selector (CPC Hand #1) to select the part of the pic you want to save. To select it, click your mouse on CPC Hand #2, hold the button(click) then drag it towards the CPC Hand #2). You should be able to see dotted lines around your selection (inside the dotted lines).1. When the image you would like to capture is on screen, press the PRINT SCREEN KEY (CPC Hand #1) on your keyboard. You can only take ONE picture at a time.
2. Open ANY photo editing software. If you are using Windows, you will have MSPaint (aka Paint) and probably MS Picture Manager. Of these 2, I would prefer Picture Manager. **MS stands for MicroSoft duh ;-)**
3. Load up the "captured" or "grabbed" image to Paint or Picture Manager by: (a) Click Edit>Paste (Yellow Highlighted Menu Bar) OR (b) While pressing down CTRL KEY (CPC Hand #2), press the V KEY.
Now, you should be seeing the captured screen. If you want the WHOLE pic, then you can save it now. But if you just want a certain "part" of the captured screen, then we will CROP or TRIM it.
4. Basic Editing Using Paint.

(b) Saving the Image. Click File>Save As in the Menu Bar. You may save it as BMP (original file format. But I like JPG first or PNG second. BMP is too big for me ;-) For reference, let's name the file playercard.jpg.
(c) Resizing the Image. Depending on where you are going to paste it, you may need to resize it to fit, say, the sidebar of your blog. Let us assume that your sidebar can accept up to 210px in width. Now, open the playercard.jpg. To resize this, click Image>Attributes in the Menu Bar. Type in 210 in the width box, tick pixel and tick color. Don't worry about the height. It will adjust itself appropriately. Now, save it again.
Congratulations! You now have an image that perfectly fits your sidebar! ;-)
5. Basic Editing Using Picture Manager.
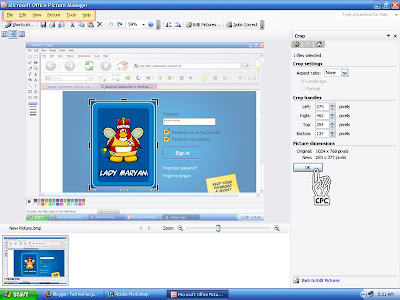
(a) Selecting & Cropping the Image. Click Picture>Crop in the Menu Bar. Drag the black bounding lines to the part of the captured image you want to save (as shown below), then click ok to crop it.
 (b) Resizing the Image. Again, if you want the entire pic, then you may save it now. Otherwise, we will resize it again at 210px in width. Click Picture>Resize in the menu bar. Now tick "custom width x height." Again, you only have to type in the width coz the height will adjust itself. Now, click ok to resize it.
(c) Saving the Image. If you want to save this to its original file format BMP, then you can do File>Save As in the Menu Bar. But, if you want to save this in another file like JPG and PNG, do File>Export then choose the file format you want. Since we have already resized this, save this in original file size.
Congratulations! Now you know how to screen grab and basic editing.
Question: Supposing you are in a cp party and would like to take PICTURESSSSSS, surely you can not do "print screen>ctrl+v>save as" over and over... you will end up just taking pictures and not at all enjoying the party... :-(
For the next post, i will teach you how to take UNLIMITED number of pictures in a breeze! ;-) This is actually what I personally use.
Now, let me know in comment if this helps you. Please remember that we are doing basics for the mean time for the sake of those who are just starting up! ;-)


Sunday, June 08, 2008 7:46:00 PM
Believe it or not but pen actually knew EVERY bit of that ;)
and so pen thinks hes ready for the advanced stufff. cos everyone knows how good pen is at technology ;)
Monday, June 09, 2008 6:53:00 AM
really?! are you serious? lol! dont worry we will get there. but first we have to take care of those who are just starting up ;-)
Tuesday, June 10, 2008 12:22:00 AM
glares at.... *burts into tears*
*covers face with hands *Looks up* realises that no ones giving him any attention*
*sighs and gets back to homework*
:D
Tuesday, June 10, 2008 8:08:00 PM
I cant understand ANYTHING! :(
:(
NIcole 744
Wednesday, June 11, 2008 6:15:00 PM
What photo editing software or site do you use? Plz make a post on whitch one you use or E-mail me at: Yellowpuffle2@Gmail.com
Thnx!
~Aaron565
Wednesday, June 11, 2008 6:43:00 PM
hello!
nicole744: oh! but i made as simple as i can, and with pictures even ;-) what dont you understamd exactly? maybe i can help you further ;-)
aaron565: i use adobe photoshop and adobe image ready. just those. i dont use online editors. yup! i will make a tutorial on photo editing but it will be on another software coz not everybody has adobe photoshop and you gotta buy that :-( theres not even a trial version or an online version ;-) so please keep visiting ;-)
Saturday, July 05, 2008 4:42:00 PM
Hey Lady Maryann!
Great Blog, Im luving it!
But actually, I knew all of that!
It was kind of simple actually!
I suggest that you use Snipping Tool!
Thanks!
From,
MishMash216
Tuesday, July 08, 2008 10:14:00 AM
On Photobucket I heard it works with Adobe Photoshop Elements.
Monday, August 04, 2008 6:40:00 PM
QUESTION: Well Im following all the rules but it seems like I need to do something else after putting the dotted lines around it before saving. I followed all that an I got the entire page but I just want my penguin what r u supposed to do?
(im a beginner be patient with me)
Super Secret Shady Spy Ninja,
Moogasa
Post a Comment