Favicon Fun
Tuesday, January 06, 2009
Welcome everyone to this Html-Guide. My name is Dmaster.
Today's Technopengi is about Favicons.
So what is a Favicon?
A Favicon is the icon that appears before a URL when you enter a webpage. In blogger it is set as a the orange Blogger-Logo, you all know.
This can be changed to a personalized logo with these steps:
1. Make a logo 16 X 16 pixels or 32 X 32. ( I suggest a low detail image otherwise it will be not easy to see and not very clear.) Here are samples which you may copy/download and use as template:
2. Upload the image ( 16 x 16 or 32 x 32 ) to a web image hosting service NB not photobucket I encountered some problems with that.
3. Find the direct URL. (by direct URL I mean the URL that take you to only the image)
4. Copy the direct URL.
5. Open blogger. Click the layout link, the "edit HTML" tab, this takes you to the HTML source of your template.
Search for the title tag, as shown
and after that, type

paste your direct URL where it says url of your logo.jpeg
NB put quotation marks at the end and beginning of the URL
(Note: your image can also be gif, png, or ico - LM)
6. Save Template and you're done!
Congrats you made a Favicon!
Hope this wasn't too hard. Feel free to comment!
Next time if you want something simple, I have a few ideas in mind…
Dmaster/David
UPDATE: IF IT DIDN'T WORK TRY THE alternant code on Favicon Fixes
Today's Technopengi is about Favicons.
So what is a Favicon?
A Favicon is the icon that appears before a URL when you enter a webpage. In blogger it is set as a the orange Blogger-Logo, you all know.
This can be changed to a personalized logo with these steps:
1. Make a logo 16 X 16 pixels or 32 X 32. ( I suggest a low detail image otherwise it will be not easy to see and not very clear.) Here are samples which you may copy/download and use as template:
2. Upload the image ( 16 x 16 or 32 x 32 ) to a web image hosting service NB not photobucket I encountered some problems with that.
3. Find the direct URL. (by direct URL I mean the URL that take you to only the image)
4. Copy the direct URL.
5. Open blogger. Click the layout link, the "edit HTML" tab, this takes you to the HTML source of your template.
Search for the title tag, as shown

and after that, type
paste your direct URL where it says url of your logo.jpeg
NB put quotation marks at the end and beginning of the URL
(Note: your image can also be gif, png, or ico - LM)
6. Save Template and you're done!
Congrats you made a Favicon!
Hope this wasn't too hard. Feel free to comment!
Next time if you want something simple, I have a few ideas in mind…
Dmaster/David
UPDATE: IF IT DIDN'T WORK TRY THE alternant code on Favicon Fixes
xAguair Mascot Contest
Monday, September 01, 2008
Here is my entry to xAguair's Mascot Contest. I hope I win.
The Panda Mascot at 200px by 200px
Here is one sample where you can use the mascot in a scene.
I made this 2 pics in an hour. A little longer than I expected. That is because I got hooked reading Scotland's history ;-)

The Panda Mascot at 200px by 200px
Each of the Mascot's eye, mouth, ear, hand and foot can be rotated, resized, moved however you want. I think official mascots should be able to reflect current theme or emotion of the site/organization they are representing ;-)
Here is one sample where you can use the mascot in a scene.
Details:
1. The Blue-White Sunburst - A representation of Scotland's Blue & White Flag. That's where Aguair is ;-)
2. The Sun - Well, it's a GEAR, representing xAguair's interest in internet technology
3. The Lawn - Green Grass means Bounty: bounty in information that the site provides its readers
4. The Flowers - The flowers are called THISTLE, Scotland's National Flower. Read it in WIKI, it's got very nice story ;-)
5. the xAguair Banner - this is an example how the mascot can be made to hold ANYTHING. And I mean, ANYTHING ;-)
6. The Panda - I haven't got a name for it yet, considering I just knew of this contest only 2 hours ago ;-)
I made this 2 pics in an hour. A little longer than I expected. That is because I got hooked reading Scotland's history ;-)
Now, go to xAguair's Site and vote for me ;-)
Sunburst
Tuesday, August 26, 2008This is a
SUNBURST
Materials Needed:
1. Adobe Photoshop (any version) Software
2. No previous knowledge of Adobe PS is required.
Open your Adobe Photoshop and...
1. Adobe Photoshop (any version) Software
2. No previous knowledge of Adobe PS is required.
Open your Adobe Photoshop and...
LET THE FUN BEGIN! ;-)
1. Open a new file: FILE>NEW
2. Make the new file as shown below: 500px wide by 500px tall at 72DPI. OK.
2. Make the new file as shown below: 500px wide by 500px tall at 72DPI. OK.
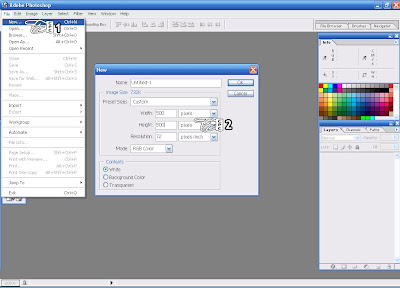
3. Double click Layer "Background" and rename it to "1" to remove Lock
4. Locate the Paint Bucket-Gradient Tool Toggle and make it "Gradient" as shown
5. Let's use Blue-Yellow-Pink Gradient. You can choose any later
6. Choose "Linear" Gradient
4. Locate the Paint Bucket-Gradient Tool Toggle and make it "Gradient" as shown
5. Let's use Blue-Yellow-Pink Gradient. You can choose any later
6. Choose "Linear" Gradient
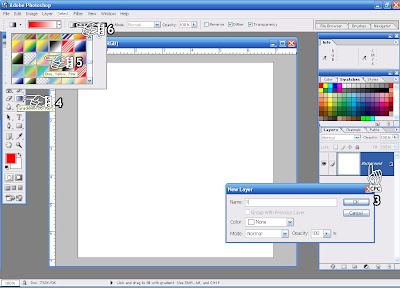
7. Now apply the Gradient to the whole layer by drawing a straight line from CPCHAND 7 through CPCHAND 8.
8. If you have a hard time making a straight line, press the SHIFT KEY while drawing the line.
8. If you have a hard time making a straight line, press the SHIFT KEY while drawing the line.
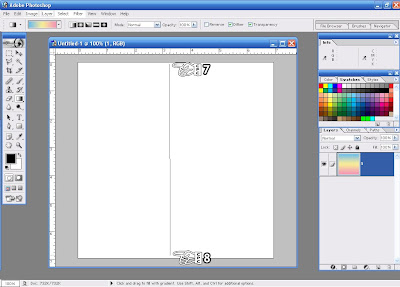
9. Now your layer should look like this:

10. Now go to: FILTER>DISTORT>WAVE
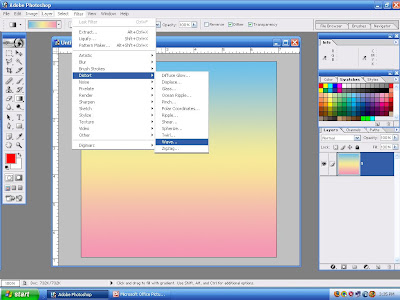
11. Now, follow the WAVE CONFIGURATION below: (you may play with the bars until you find what you want :-)
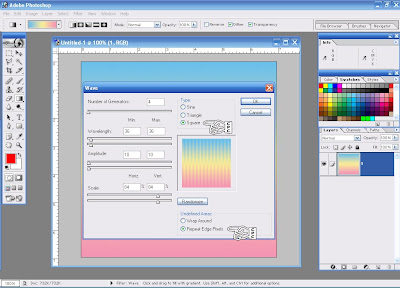
12. If you followed the values above, you should have this:
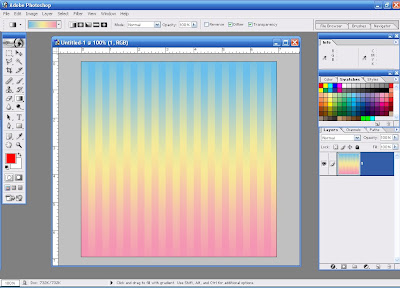
13. Now go to: FILTER>DISTORT>POLAR COORDINATES and configure like this:
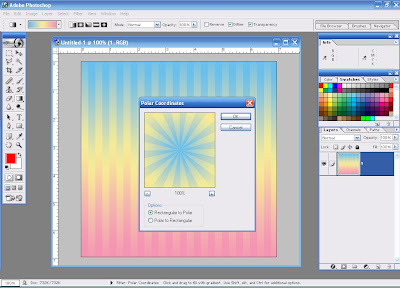
14. Now, you have the 3-colored Sunburst! Yay! ;-) I told yah it's easy ;-)

We can add more pizzaz!
How about we add some lights?
How about we add some lights?

And a SUN Clipart?

Or perhaps a Glass Effect?

Or a Water Ripple Effect?

Or maybe ZigZag it twice over?

Enjoy your Sunburst!
I hope you don't get burned ;-)
Tag Cloud / Label Cloud Widget
Sunday, August 03, 2008
Did you ever wonder what those links beneath my banner & page buttons are? Well, they are TAGS or LABELS for my posts. I put labels on my posts so that readers can easily find the topic they are looking for. Blogger has a built-in Label Widget, but oh! how boring the presentation is! Label Cloud is waaaay fuuuuunkier! ;-)
Here is ONE way, well actually THE EASIEST WAY, how to put a Label/Tag Cloud on your site!
First, go to www.tagcloud-generator.com
Then, follow these steps:
01. Add Your Tags: Tick "All Links from the Website". Then, type in the URL of your website. There is also an option where you can enter your tags manually.
But then, why would you do that?
Unless you enjoy inflicting pain on yourself! hehehe.
The rule of thumb is, if you let the generator automatically generate label cloud for you, you don't have to do anything if you have new tags. If you add tags manually, then you have to manually add tags everytime you have a new tag. Aaaarrrggghhh!
02. Parameterize Your Tag Cloud: In other words, "Funky-size Your Tag Cloud". Customize your tag cloud to fit your site's theme. A small tip though, at the very bottom of this step, you will see the Paragraph parameter. Tick the second or middle alignment option. This looks good than the other 2. Trust me ;-)
03. Your Tag Cloud View: This is how your Tag Cloud looks like after doing all parameters in step 02.
04. HTML Code for Your Website: If you like what you see in step 03, then copy the generated HTML code and paste it on your sidebars or below your header.
That's it! Isn't is as easy as ABC? ;-)
This is NOT the way how I did mine though. I went with the Long Hard Way. If you want to know how I did mine, say in comment and I may post about it next time.
But then, again, why would you do the long hard way when you have the short easiest way at your disposal?
Unless, again, you enjoy inflicting pain on yourself.
Like me! Mwahahaha! ;-)
No Guts, No Glory
No Pain, No Gain
No Pain, No Gain
Blog Trick #2: Center Alignment
Sunday, August 03, 2008This is the Right Yellow Sidebar in Club Penguin Crazy Main Page

Things that you put on your sidebars are called Widgets. They are small programs or scripts or codes that do specific tasks. The problem is, those widgets are often shown or posted on the LEFT! It would definitely be nicer if those widgets are posted right at the CENTER!
Here is how:
For example purposes, we will use Who's On Widget from www. amung.us. This is the code that Amungus gives you.

This code adds the widget to the LEFT of your sidebar.
To move the widget to the center, simply add the codes highlighted in red at the beginning and end of the code above:
To move the widget to the center, simply add the codes highlighted in red at the beginning and end of the code above:
 Now, the widget will be added to the CENTER of your sidebar.
Homework: Try replacing the word "center" in the code with the following and see what happens:
1. Left
2. Right
3. Justify
Enjoy the Code! ;-)
Grab Image & Basic Photo Editing: Part 1
Sunday, June 08, 2008I think blogging is much more interesting and effective if it has nice pictures to go with great posts. You are NOT going to find a Club Penguin blog WITHOUT pictures ;-) You might be surprised that quite a number of CP bloggers emailed me asking how to take pics. After this tutorial, you won't be copying pics from other sites again ;-)
METHOD #1: Using What Is Already In Your Computer
This is very easy. But you couldn't really do much ;-)
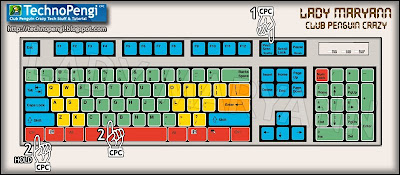
1. When the image you would like to capture is on screen, press the PRINT SCREEN KEY (CPC Hand #1) on your keyboard. You can only take ONE picture at a time.
2. Open ANY photo editing software. If you are using Windows, you will have MSPaint (aka Paint) and probably MS Picture Manager. Of these 2, I would prefer Picture Manager. **MS stands for MicroSoft duh ;-)**
3. Load up the "captured" or "grabbed" image to Paint or Picture Manager by: (a) Click Edit>Paste (Yellow Highlighted Menu Bar) OR (b) While pressing down CTRL KEY (CPC Hand #2), press the V KEY.
Now, you should be seeing the captured screen. If you want the WHOLE pic, then you can save it now. But if you just want a certain "part" of the captured screen, then we will CROP or TRIM it.
4. Basic Editing Using Paint.
(a) Selecting/Cropping the Image. Click the Rectangular Selector (CPC Hand #1) to select the part of the pic you want to save. To select it, click your mouse on CPC Hand #2, hold the button(click) then drag it towards the CPC Hand #2). You should be able to see dotted lines around your selection (inside the dotted lines).1. When the image you would like to capture is on screen, press the PRINT SCREEN KEY (CPC Hand #1) on your keyboard. You can only take ONE picture at a time.
2. Open ANY photo editing software. If you are using Windows, you will have MSPaint (aka Paint) and probably MS Picture Manager. Of these 2, I would prefer Picture Manager. **MS stands for MicroSoft duh ;-)**
3. Load up the "captured" or "grabbed" image to Paint or Picture Manager by: (a) Click Edit>Paste (Yellow Highlighted Menu Bar) OR (b) While pressing down CTRL KEY (CPC Hand #2), press the V KEY.
Now, you should be seeing the captured screen. If you want the WHOLE pic, then you can save it now. But if you just want a certain "part" of the captured screen, then we will CROP or TRIM it.
4. Basic Editing Using Paint.
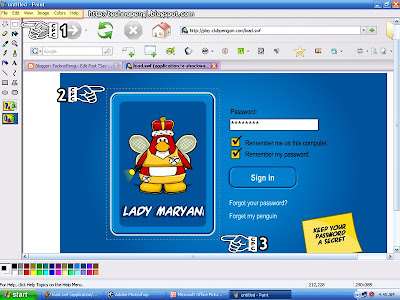
(b) Saving the Image. Click File>Save As in the Menu Bar. You may save it as BMP (original file format. But I like JPG first or PNG second. BMP is too big for me ;-) For reference, let's name the file playercard.jpg.
(c) Resizing the Image. Depending on where you are going to paste it, you may need to resize it to fit, say, the sidebar of your blog. Let us assume that your sidebar can accept up to 210px in width. Now, open the playercard.jpg. To resize this, click Image>Attributes in the Menu Bar. Type in 210 in the width box, tick pixel and tick color. Don't worry about the height. It will adjust itself appropriately. Now, save it again.
Congratulations! You now have an image that perfectly fits your sidebar! ;-)
5. Basic Editing Using Picture Manager.
(a) Selecting & Cropping the Image. Click Picture>Crop in the Menu Bar. Drag the black bounding lines to the part of the captured image you want to save (as shown below), then click ok to crop it.
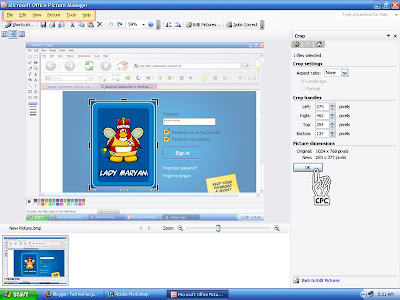 (b) Resizing the Image. Again, if you want the entire pic, then you may save it now. Otherwise, we will resize it again at 210px in width. Click Picture>Resize in the menu bar. Now tick "custom width x height." Again, you only have to type in the width coz the height will adjust itself. Now, click ok to resize it.
(c) Saving the Image. If you want to save this to its original file format BMP, then you can do File>Save As in the Menu Bar. But, if you want to save this in another file like JPG and PNG, do File>Export then choose the file format you want. Since we have already resized this, save this in original file size.
Congratulations! Now you know how to screen grab and basic editing.
Question: Supposing you are in a cp party and would like to take PICTURESSSSSS, surely you can not do "print screen>ctrl+v>save as" over and over... you will end up just taking pictures and not at all enjoying the party... :-(
For the next post, i will teach you how to take UNLIMITED number of pictures in a breeze! ;-) This is actually what I personally use.
Now, let me know in comment if this helps you. Please remember that we are doing basics for the mean time for the sake of those who are just starting up! ;-)


