
Rainbow
Yeehaw! 
Nice huh? It's very easy to make too! :D
The tools needed for this tutorial are:
1. Adobe Photoshop (PS), any version. I am using version 7.1
2. Minimal or No previous knowledge in PS is required.
You can view the larger version of the images by clicking them.


Arrow 15. Click FILTER ~ DISTORT ~ POLAR COORDINATES.
Arrow 16. Tick RETANGULAR TO POLAR. This should make a sphere out of your Gradient.
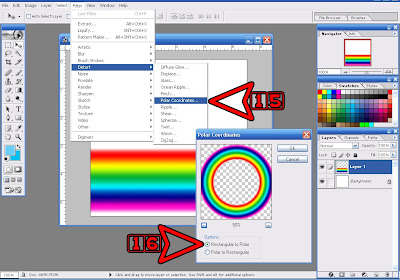
Arrow 17. There is none! Don't sleep in class!!! WAKE UP!!!! teehee :D
Arrow 18. Now, since we only need "HALF" of the sphere to make a RAINBOW, make a selection (Arrows 5-7) again. Drag your mouse all the way down to Arrow 19. No need to leave a space below the sphere. And then press "DELETE" on your keyboard

Now, you have your FIRST RAINBOW! Congratulations!

I told you it's easy :D
Now, to lock-in your mastery at creating rainbows,
here's your homework.
On your own, make something like this...
 I made the Image on the Left and
Billybob made the Image on the Right
 You can use ANY color you want
It does not have to be ROY G. BIV :D
 Don't worry about the thin "SPACE" between BLUE and GREEN
The next step will FIX it.
 See? No more thin space between BLUE and GREEN :D
 You can use any image you want
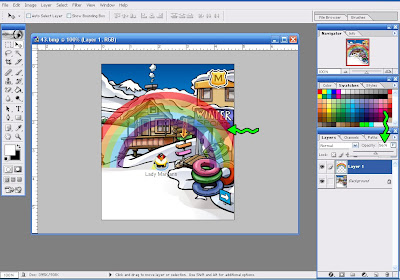
You can fit your RAINBOW in the "SKI VILLAGE" pic by scaling it, rotating it, deleting the parts of the Rainbow that you don't need, and adjusting the opacity to blend with the pic.
Let me see YOUR RAINBOW by emailing it to me! :D
If you got question, write it in comment.
~Lady Maryann~
 Did you use a new layer for the gradient?
Email me you Rainbow! :D
Wow! It's been a looong time since I wrote a tutorial here. It's a good thing that DMaster is here to post some tech tutorials for me! Thanks DMaster! 
I bet you're here because of the heads up I posted at the CPCrazy Main Page. Don't lie, you you penguin you!!!
Hehe
Anyho, with CP putting a RAINBOW on CP for the very first time, I think teaching you how to make one would be fun!
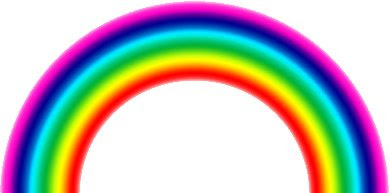
So, today I'm gonna teach you how to make a Rainbow using Adobe Photoshop. At the end of this tutorial, you should be able to make something like this...
I bet you're here because of the heads up I posted at the CPCrazy Main Page. Don't lie, you you penguin you!!!
Hehe
Anyho, with CP putting a RAINBOW on CP for the very first time, I think teaching you how to make one would be fun!
So, today I'm gonna teach you how to make a Rainbow using Adobe Photoshop. At the end of this tutorial, you should be able to make something like this...

Nice huh? It's very easy to make too! :D
The tools needed for this tutorial are:
1. Adobe Photoshop (PS), any version. I am using version 7.1
2. Minimal or No previous knowledge in PS is required.
You can view the larger version of the images by clicking them.
LET THE FUN BEGIN!
Arrow 1. Click FILE ~ NEW
Arrow 2. You can define any size but for this tutorial, let's us 400px wide by 400px tall at 72dpi. (Later, you may experiment using a non-square layer, say, 200px wide by 300px tall and see what happens :D)
Arrow 2. You can define any size but for this tutorial, let's us 400px wide by 400px tall at 72dpi. (Later, you may experiment using a non-square layer, say, 200px wide by 300px tall and see what happens :D)

Arrow 3. Click the icon "Create New Layer"
Arrow 4. After clicking, you will see that a new layer "Layer 1" is added. Make sure that the "EYE" and "Brush" icons are on Layer 1.
Arrow 4. After clicking, you will see that a new layer "Layer 1" is added. Make sure that the "EYE" and "Brush" icons are on Layer 1.

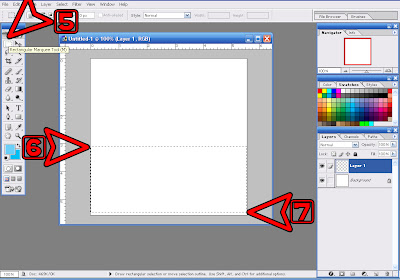
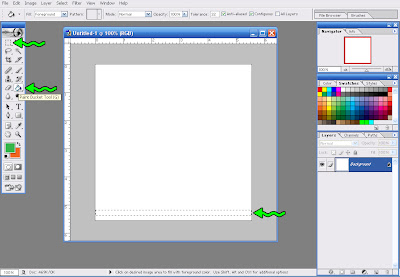
Arrow 5. Click the Rectangular Marquee Tool.
Arrow 6. Make a selection by clicking on the EXTREME left and dragging it all the way to the right where Arrow 7 is at. Please make sure that there is a SPACE below the selection. There should be NO SPACE on the left and right of the selection.
Arrow 6. Make a selection by clicking on the EXTREME left and dragging it all the way to the right where Arrow 7 is at. Please make sure that there is a SPACE below the selection. There should be NO SPACE on the left and right of the selection.

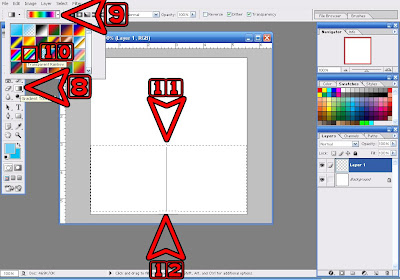
Arrow 8. Click the Gradient Tool (it's inside the Paint Bucket icon)
Arrow 9. Click on the Drop-Down Menu and
Arrow 10. Choose "Transparent Rainbow" (you can experiment later with other Gradients)
Arrow 11. Now, hover on the top part of the rectangular selection and drag your mouse all the way down to Arrow 12. If you can't make a straight line going down, press the SHIFT KEY while you're dragging the mouse.

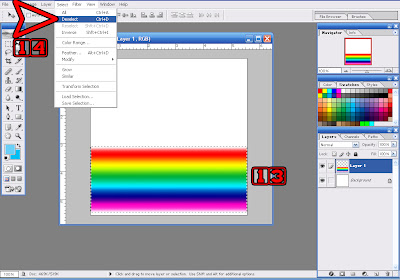
Arrow 13. Now you should have this. Please note that there should be a SPACE at the BOTTOM of the Gradient and NO SPACE at the left and right of the Gradient.
Arrow 14. Now deselect the Gradient by clicking SELECT ~ DESELECT or use shortcut keys CTRL+D
Arrow 14. Now deselect the Gradient by clicking SELECT ~ DESELECT or use shortcut keys CTRL+D

Arrow 15. Click FILTER ~ DISTORT ~ POLAR COORDINATES.
Arrow 16. Tick RETANGULAR TO POLAR. This should make a sphere out of your Gradient.

Arrow 17. There is none! Don't sleep in class!!! WAKE UP!!!! teehee :D
Arrow 18. Now, since we only need "HALF" of the sphere to make a RAINBOW, make a selection (Arrows 5-7) again. Drag your mouse all the way down to Arrow 19. No need to leave a space below the sphere. And then press "DELETE" on your keyboard

Now, you have your FIRST RAINBOW! Congratulations!

I told you it's easy :D
Now, to lock-in your mastery at creating rainbows,
here's your homework.
On your own, make something like this...
 I made the Image on the Left and
Billybob made the Image on the Right
Except for the forgotten YELLOW "bow" teehee
I think I did pretty well, whachathink? :D
I think I did pretty well, whachathink? :D
Here are some hints on how to go about it..

 You can use ANY color you want
It does not have to be ROY G. BIV :D
 Don't worry about the thin "SPACE" between BLUE and GREEN
The next step will FIX it.
 See? No more thin space between BLUE and GREEN :D
 You can use any image you want
You can fit your RAINBOW in the "SKI VILLAGE" pic by scaling it, rotating it, deleting the parts of the Rainbow that you don't need, and adjusting the opacity to blend with the pic.
Let me see YOUR RAINBOW by emailing it to me! :D
If you got question, write it in comment.
~Lady Maryann~
UPDATE: STUDENT WALL
This is Leclercian a.k.a Supdudes35's Rainbow!
Good work Lec!
Good work Lec!
 Did you use a new layer for the gradient?
Email me you Rainbow! :D
Sunburst
This is a
SUNBURST

and I will teach you how to make one. But instead of just 2 alternating colors, I will teach you how to make the 3-colored Sunburst below. It is soooo easy! ;-)
Materials Needed:
1. Adobe Photoshop (any version) Software
2. No previous knowledge of Adobe PS is required.
Open your Adobe Photoshop and...
1. Adobe Photoshop (any version) Software
2. No previous knowledge of Adobe PS is required.
Open your Adobe Photoshop and...
LET THE FUN BEGIN! ;-)
1. Open a new file: FILE>NEW
2. Make the new file as shown below: 500px wide by 500px tall at 72DPI. OK.
2. Make the new file as shown below: 500px wide by 500px tall at 72DPI. OK.

3. Double click Layer "Background" and rename it to "1" to remove Lock
4. Locate the Paint Bucket-Gradient Tool Toggle and make it "Gradient" as shown
5. Let's use Blue-Yellow-Pink Gradient. You can choose any later
6. Choose "Linear" Gradient
4. Locate the Paint Bucket-Gradient Tool Toggle and make it "Gradient" as shown
5. Let's use Blue-Yellow-Pink Gradient. You can choose any later
6. Choose "Linear" Gradient

7. Now apply the Gradient to the whole layer by drawing a straight line from CPCHAND 7 through CPCHAND 8.
8. If you have a hard time making a straight line, press the SHIFT KEY while drawing the line.
8. If you have a hard time making a straight line, press the SHIFT KEY while drawing the line.

9. Now your layer should look like this:

10. Now go to: FILTER>DISTORT>WAVE

11. Now, follow the WAVE CONFIGURATION below: (you may play with the bars until you find what you want :-)

12. If you followed the values above, you should have this:

13. Now go to: FILTER>DISTORT>POLAR COORDINATES and configure like this:

14. Now, you have the 3-colored Sunburst! Yay! ;-) I told yah it's easy ;-)

We can add more pizzaz!
How about we add some lights?
How about we add some lights?

And a SUN Clipart?

Or perhaps a Glass Effect?

Or a Water Ripple Effect?

Or maybe ZigZag it twice over?

Enjoy your Sunburst!
I hope you don't get burned ;-)


